Thursday, December 31, 2015

Best wishes for 2016

Good afternoon! Been cleaning up all the Christmas stuff today and took a break to play in the stamp room. These adorable bunnies were calling my name. A manager at my husbands work is moving onto another company. I know she will adore these bunny wishes into her new job.  ;-)  


This is called Wishin Well and I think Stampendous might have this now? They are stamped on white cardstock and colored with Copic markers. Added a fence edge at the bottom with some pink flowers to bring out the pink in their ears. The coins have some added sparkle added to them.  We are going to miss her, she is one special lady! Have a wonderful and safe New Years! 


Wednesday, December 30, 2015

Wrapped up Blessings


Good  morning! On the CardMaker Blog today is my last post for my term. It has been a pleasure to work with Cardmaker Magazine again. Brooke and Tonya are fantastic ladies and such a joy! Thank you girls again for such a great time.   So head on over to the CardMaker Blog and check out the Tutorial today. You can find this Double Z-fold tutorial on my tutorial site as well. Have a wonderful day. 


Sunday, December 27, 2015

Spread your wings

Good morning! This is my last post as Guest Designer over on the Sweet n Sassy Blog today.  I want to thank Korin for having me these last two months. What a wonderful lady to design for and with such a talented group of ladies, thank you so much. 


My creation today is using the beautiful Majestic Monarchs stamp set. I stamped three of the different sized butterflies onto white card stock and colored with Copic markers. I delicately cut around each of the wings and only the biggest butterflies antennas. They curled as I cut them so closely which was perfect! If you want to die cut them instead, check out the Monarch Dies matched to the stamp set. Layered them onto the card base and added sparkles for some fun. A few scattered jewels and voila! Hope you have a wonderful day!


Saturday, December 26, 2015

Now this is dedication


 Good morning. Now this is dedication or insanity... ;-)  I am not sure my husband would let me take up an entire living room like this. Wow though! Anyone coming to look would be charged admission for all the work I would end up doing. ha ha!  Looks beautiful and festive. Have a great day! 


Friday, December 25, 2015

A Baby Changes Everything


Good morning. This song by Faith Hill is so moving and then this video was added.... beautiful. 
Have a very Merry Christmas! 


Monday, December 21, 2015

Fun weekend surprise

This was a fun weekend and I wanted to share with you all! We planned  a games and goodies night on Saturday with our closest friends. While making all the goodies and visiting, they pull out this box for us to open. Inside is t-shirts for us all to all wear and a ticket stub they created for us all to go and see Star Wars, The Force Awakens... THAT NIGHT! Oh my word! They played this night so well, we had no clue.  


Talk about EXCITING! We changed shirts really quick and the 9 of us drove to the movie (which was a new theatre with leather reclining seats) super cool. We could barely contain our excitement. Full house of people all enjoying the movie! I will not say any spoiler alerts but.... it was AWESOME! Oh my!!! They totally knocked this one out of the park. 
What a great gift from the best friends anyone could have. After the movie we played games, ate the goodies we had made earlier and had a really late night but worth it. Hopefully you are able to get out and see Star Wars this week or next. Thanks for stopping in today.  Have a wonderful day. 


Sunday, December 20, 2015

FS463 Snow friends

This weeks Featured Stamper 463 is Cheri aka cburry. Her gallery is so vibrant and colorful just what this cold and cloudy weather needs this week. I choose this Snowmen card to case. I will admit I see several snowman's in her gallery that I must have in my collection now. hee hee  I kept with the over all layout, snowmen, same paper and colors. Changed the snowman images, ribbon placement added jewels to the corner, stickles and a button and twine combo. Enjoy your week! 


Dusted off this retired Close To My Heart stamp set called Snow Friends. These guys are just darling aren't they. Well, all my smowmen are adorable as I say often. hee hee  They are stamped onto white card stock and colored with Copics to match the designer paper in the background. Added some mesh ribbon and then overlay of ribbon with a button corner. Sparkles on the snowman, you can't have snowman and no sparkle. Voila! Have a fabulous day! 


Friday, December 18, 2015

Just one week away


EEK!! Just a week away from Christmas day! Hope you are ready. Here is a sneak peek at my post over on the CardMaker Blog today. Head on over and check it out! Hope your day is awesome!


Tuesday, December 15, 2015

Mitten Tags


Supplies:

Cardstock, Plush Mitten DiePeaceful Poinsettias Die, scissors, adhesive, needle, twine, desired sentiment stamp.


Step 1

Die cut all shapes in colors desired. I am using all white for the tag and red to stand out for the poinsettia.


Step 2

Stamp desired sentiment on the mitten. I placed the sentiment at the top so they have enough room to still write to and from on the front as requested. The sentiment is from Botanical Tree stamped in black ink


Step 3:

Thread twine (shown here is a sparkly white twine) that I tied into a knot and threaded on the needle. My knot is on the inside of the mitten held down with a glue dot for ease of threading.


Step 4:

Here you see I started to thread the twine through. You can thread anyway you would like, I choose the in and out version if that is what its called.  :-)


Step 5:

Here is my mitten with all edges threaded. Now don't look too closely or you will see where I threaded the wrong way. I was already about to the end when I noticed. EEK. Don't worry I can cover that up and no one will notice. hee hee  I tucked the thread inside the corner where I started with the tip of the needle and added a little bit of glue from the side to help keep it in place. now finish decorating as desired


Step 6:

My final tags. I created two as they requested, the one laying flat has a faux stitching around the edge. Just another option you can used. Added ribbon and twine button at the top of the tag and some sparkles to the poinsettias. Enjoy!


Christmas Mittens

Someone STOP me!!! I have been smitten with these mittens... bawhaha... Okay bad pun, but these mittens are awesome! I had a request for some larger than normal gift tags and these mittens were the first thing that came to mind. 


If you haven't seen all my mitten creations, check out these tutorials 
Now... my Mitten Gift Tag.

You can use any mitten shape you have. Don't have a mitten die? Well I solved that with my Hot Cocoa Mitten from a few years ago.  ;-)  I have you all covered with mitten ideas. hee hee  

Actually there is one more idea with this mitten die that I am working on, but not sure I will get it done in time for Christmas. We will see. This is a Memory Box die called Plush Frosty Mitten.  My sentiment is from Botanical Tree. The mitten standing up has some shimmery twine wrapped through the stitching, and the one laying down has some faux stitching with a suduko gel pen. Both have the beautiful Peaceful Poinsettia die with some added sparkle and pearls. There is enough room left for them to write who it is to and from and still look beautiful. Wrapped a little bit of ribbon through the top and tied it off with a button and twine combo. Voila! Hope you enjoyed another mitten creation from me today. Have a great day. 


Sunday, December 13, 2015

FS462 Christmas is

Good morning! This weeks Featured Stamper Challenge 462 is sixclarks and very sweet gallery. I choose this Blossoming Inspiration card to case. I kept with blue flowers, square card and over all layout. Change the stamp, sentiment placement and added ribbon and lace trim to the base. Enjoy your week!


I also posted this over on the Sweet N Sassy Blog today, if you wanted to check it out. My Christmas cards tend to be more using blue and white color combo as that is my favorite, however I do dabble in the traditional colors. Anyways... I used Christmas Is stamp set with a few extra flowers from the set. After I colored the extra poinsettia's in the stamp set I added stickles to them all and some pearly centers. Wrapped lace and ribbon around the base of my designer paper and voila! Hope you have a wonderful week. 


Friday, December 11, 2015

Warm Wishes

Happy Friday and 14 days until Christmas! The time is flying by for those Christmas cards and I am still addressing mine to send out. EEK!!!  This adorable guy from Let's Chill was perfect for my card today. My cool background of snowflakes comes WITH this digi when you purchase it, woot woot!! Bonus! 


He is printed on white card stock and colored with Copic markers. I added bunch of sparkle to the snowflakes in the background and the snowman. A little jewel to the corner and my sentiment is from Bottlebrush Holiday stamp set. Easy Peasy! 


Don't forget the Power and Spark Rewind challenge is posted and waiting for your creations.  :-)


Thursday, December 10, 2015

Sugar Plum Fairy by Tchaikovsky


 This is..... WOW! Talk about talent with water in a glass. Beautiful!  Enjoy and have a wonderful day!


Wednesday, December 9, 2015

Mitten Giftcard Holder


Supplies:

Plush Mitten die, cardstock, designer paper, stamp set, Peaceful Poinsettia die, adhesive, ink pen, scissors.


Step 1:

Die cut two mitten shapes, one in designer paper and one solid cardstock. Die cut remaining shapes


Step 2:

Take the two mitten shapes and to the designer mitten adhere the bottom piece as shown. Using a dark colored pen that matched add faux stitching around the edges. You can see that I started mine on the left hand side of the mitten and will go around the rest of the mitten


Step 3:

Add adhesive to the solid mitten three quarters of the way up on both sides and the bottom. This is where the giftcard will slide into the mitten when placed together. Adhere together with the designer mitten


Step 4:

This is with the giftcard slide into the top. Finish decorating as desired

Step 5:

My final Mitten Giftcard Holder. I added the poinettias that I die cut with a few pearls and sprigs. Finished it off with some sparkle. My sentiment is from For My Father stamp set with a notched end. Enjoy! 


Mitten thanks

Good morning! My husband and I are so grateful for the work the girls in the school office have been doing for boosters. We wanted to give them a little something to say thanks. I created this adorable Mitten Giftcard Holder for them with a DQ giftcard inside.  ;-)  Who doesn't like Dairy Queen, right!  Just a little something to say thanks for all the extra work you have been doing. 


If you have a mitten die check out my Mitten Giftcard Tutorial and you can create your own for gifts. I made 4 of these and all were similar paper designs from the same pack. I liked the warm browns and blues for these mittens. I can't get enough of these Peaceful Poinsettia dies for cards or projects. My sentiment is from My father stamp set. Faux stitching is perfect on these mittens or you can thread ribbon, great options either way. Added some sparkles and voila. Hope you are inspired to create today. Have a wonderful day. 


Monday, December 7, 2015

Mini Box


Supplies:

Designer paper (6x6), cardstock, desired dies, stamp set, score tool, adhesive and cutting mat.


Step 1:

Cut a piece of solid card stock 5 7/8 x 5 7/8. Score a 1 inch border on all sides, snip ends to form tabs. Add adhesive and fold into box base

Step 2:

Take the designer paper 6 x 6 inch and score a 1 inch border and snip the ends. Add adhesive and form box lid


Step 3:

Here is the box lid and base


Step 4:

My sentiment is from Christmas Tunes stamped onto Circle Ornaments Die. Then layered onto Elegant Ovals. Then for the corner accent Peaceful Poinsettias with some added sparkle.

Step 5:

My final box decorated. Since I placed 8 of these chocolate caramels inside, I went ahead and wrapped some sheer ribbon around the box to help keep it closed. Added some mother of pearl jewels and voila. Enjoy! 


Home for the Holidays


Good morning! Over on the CardMaker blog today I am posting a fun little gift idea. If you would like to create your own mini box gift check out my Mini Box Tutorial. Now head on over to the CardMaker Blog to check out the full gift! Have a wonderful day. 


Saturday, December 5, 2015

Holly Frame


Supplies:

Frame (shown 10 inch x 10 inch) digital image Hollyberries, desired dies, card stock


Step 1:

Cut a piece of base cardstock that will fit the inside of frame you are using. Forest green is going to be the base matting to match the holly in mine. Set aside for now.


Step 2:

Print Hollyberries onto cardstock using the same file size for each print. This is how we will layer them after they are colored. 


Step 3:

Take one of the printed sheets and cut to fit the frame base we set aside. Leave as much edging as you would like shown through the edges when in the frame. Take the second printed sheet and trim down for ease of coloring.


Step 4:

Color your Hollyberries as desired on both the base and your extra pieces. After coloring the extra pieces delicately cut around the Hollyberries as shown to the right. This is tedious cutting but so worth the end result. I have die cut my sentiment panel and set that aside for now.
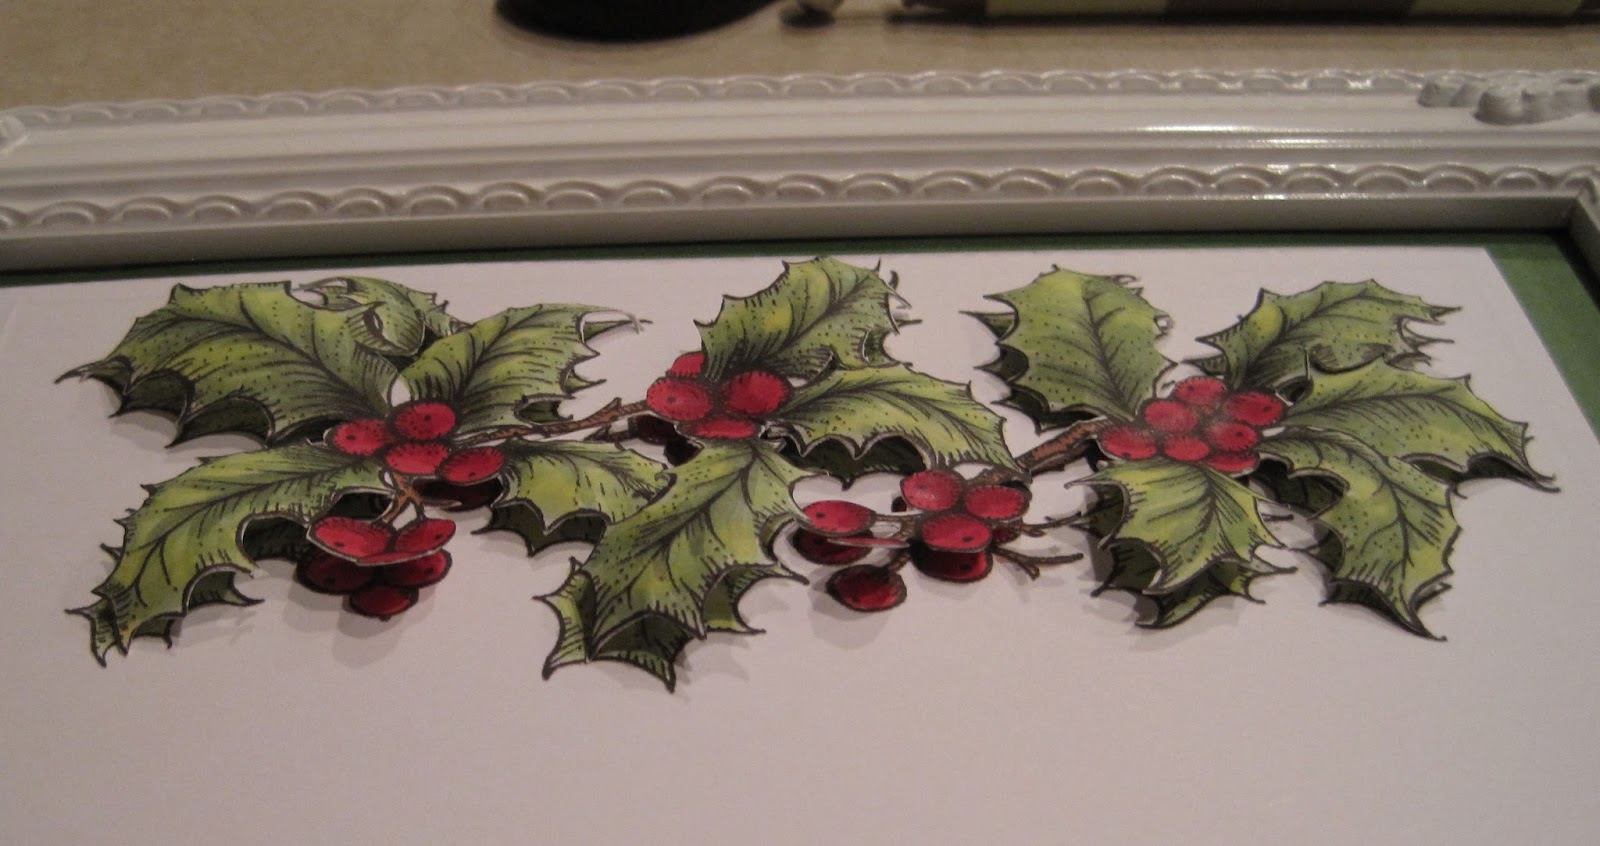

Step 5:

Using a rounded tool and mat press using circular motions on the back of Hollyberries to round the edges up. This will be all curled up as you go so be careful you don't tear any of the leaves. This is what they will look like. Add a dimensional to the berry parts as that will adhere to the base and leave the leaves to be popped up.


Step 6:

Adhere the Hollyberries to frame base. This is why they needed to be the same print size so they layer nicely over the top. Here you see the top portion only added to the frame. To the right is a close up of the top added. Finish adding the bottom and the sentiment panel and last embellishments


Step 7:

My final Hollyberries framed. I added a few scattered jewels and some sparkles to each of the leaves. To the right is a close up of the Hollyberries for you to see. Enjoy!