Saturday, July 30, 2016

Card Box Three


Supplies:

Cardstock, scissors, adhesive, desired dies (shown ODBD Hearts) scoring tool and cutting mat


Step 1:

Cut a piece of cardstock 9 inch length x 7 inch width. Save the strip that is left over from cutting and set aside. Score a 1 inch border on all four sides. Snip ends as shown to form box base. Add adhesive and fold in to form base.


Step 2

Using the strip we set aside, score at 2 3/16, 3 3/16, 8 1/4 and 9 1/4. Cut a smaller piece of the same card stock 1 1/2 inch x 4 1/2 inch.


Step 3:

Pre-fold scored lines and place the box in the middle. Add adhesive to the ends of smaller piece of cardstock and the back side of the longer piece at the ends. This is where you will adhere (If adding a scallop edge) You will need to snip the ends on the die cuts. I left the "snipped ends" in the picture, to see where to cut. Adhere both scallops as shown in middle. Add the smaller piece to the back of the two scallop die pieces. This helps sturdy the wrap for the box and cover the edges. Adhere the other side and secure


Step 4:

Now that you have secured the wrap for the box die cut desired dies. You will be covering the center panel so no need to worry


Step 5:

Adhere the heart to the center and now you can finish decorating.


Step 6:

My final card box using Forget Me Not Hearts. This would make a great wedding gift with some thank you notes inside I think. I inserted a textured cut base to the inside of the box  behind the envelope. Added a few pearls and some sparkle. Enjoy! 

Friday, July 29, 2016

Bloom forever in your heart

Good morning! Another fabulous Friday with Power Poppy as we wind down the month. I can't believe July is already over, where did the month go? School starts in just a few short weeks :-(  Such is life I guess. 
My sympathy cards area always blue and white or a soft tan and today I figured I would shake things up with some pinks and white. I know, really going wild here. HA!!  Soothing Sympathy is a wonderful set just for this. The blooms are stamped along the left side close together without masking. 


Colored each petal with Copic markers and hints of sparkle here and there. Stamped the sentiment in the middle and added scattered jewels around the edge. The pink paper for the back is actually some designer paper with tiny hearts. Added the same designer paper to the inside and voila!


Wednesday, July 27, 2016

Card Box Three

Good morning! It has been awhile since I played around with a new tutorial and my list is getting rather dusty sitting here. So I made sometime to just sit and get another one done. My list has several different card boxes to finish so this is Card Box Three with a simple belly band. Actually this is a wedding gift so I HAD to get this done sooner than later. I will be working on the note cards for the inside later and will share those once done.


A very simple gift box where the cards are shown under the belly band. This way they get a little tease of the cards before the slide the band off. My delicate flowers are from Forget Me Not Heart at Power Poppy. I wanted a softness to this gift box as it is for a wedding gift. I have added sparkles to the flowers and leaves and a few pearls for accents. 


They can set the belly band on its side to display when they are finished with the box or add more items. Just another easy little gift idea. Hope you have time to check out the Card Box Three tutorial or all the other gift boxes I have so far. More to come as well.  ;-)  Have a wonderful day! 


Monday, July 25, 2016

Rich sunflowers

Good morning! Have you had a chance to google those sunflowers that I talked about a few weeks ago? After that post I pulled up a few more to go with a much darker fall feeling leaf color for this card. Using again the beautiful Sunshine of My Life. See how rich these browns and almost dark red colors look. Wow! Really love how this one card turned out and the colors. The vase is a soft mauve color so that you really focus on the blooms in the vase. 


This plaid like paper was perfect for the card since it matched my colors almost perfectly. Below is what the card looks like when closed since I added the decorative Spellbinders edge to the bottom. A simple button and twine for the corner and some suduko gel pen to the leaves. You can't see it in the photo, but they are there and it adds that final touch. Voila! 


I hope you have a fantastic day! 


Friday, July 22, 2016

B is for Birthday fun

Happy Friday! Have you played along in our Power and Spark challenge this month? Kathy is our host with a fun filled challenge called B happy! Check out the Power Poppy Blog HERE for details and linking up your creation!


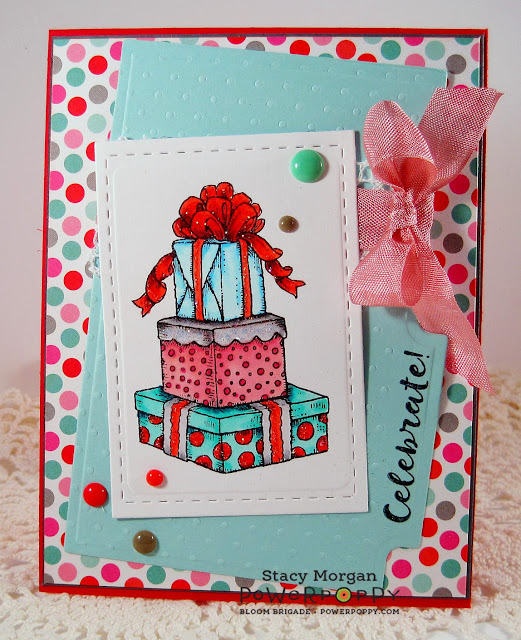
This load of presents is so fun to color. They are from the set called Party Time! What a great set for birthday occasions. My designer paper was my colors of choice for this card. The enamel dots look like an olive green in the photo, yet they are grey in person. Could not get the camera for the life of me to work with me on that. ;-)  My presents are colored with Copic markers and some added sparkles to the bow, dots and the center present lid. Die cut a recipe shaped sea foam panel and added textures with swiss dots. Wrapped some lace trim and ribbon before it was secured to the base. My sentiment on the side and volia! 

Check out the Bloom Brigades creations today:

Cindy Lawrence
Julie Koerber
Kathy Jones
Tosha Leyendekker


Wednesday, July 20, 2016

Hello friend


Afternoon! Stepped into the stamp room this morning for a little break time and thought I would color up some blooms. These are from Dynamic Duos Foxglove and Ranunculus stamp set. They are stamped on white card stock using Memento black ink and colored with various Copic markers. Very simple card with some designer paper layered onto more breezy colored card stock and layered on the white base. Some mesh ribbon with pink ribbon for the center. Die cut the image panel with Lil inkers stitched rectangles die and layered onto cotton candy cardstock. My sentiment in the corner and some jewels to finish it off. Voila! Now off to play in the sun! Have a wonderful afternoon. ;-)

Monday, July 18, 2016

Rosy you say

Rosy morning to you all.  My creation today is a very clean and easy peasy card with this beautiful single rose from Everything' Even Rosier stamp set. 


Only three roses stamped around the base left corner as you can see. You are probably wondering why didn't she mask the one and make them closer. Well... I thought of that after the second one was stamped already. ha!  So much for thinking ahead. It looks fine this way spaced out, but might have to make a second attempt with them being masked closer together. Each bloom is colored with Copic markers. A simple yellow base for the card and a ribbon tied at the top into a little bow. My petals have a suduko gel pen added for highlights in the corners, but hard to see in the photo. See, easy peasy! Hope you have a fabulous day! 

Friday, July 15, 2016

You are so kind

Check it out! The new digi from the Instant Garden at Power Poppy is here and it is called Sunshine of My Life. Isn't this just awesome? Marcy has some thoughts she is sharing behind this newest work of art she has created for us. Head on over to the Power Poppy Blog for all the details. 


I printed a few of these and have been enjoying coloring all the different ways I can think of. You should google Sunflowers and see all the different shades of hybrids they have. Not to mention when coloring on paper you can color whatever colors you want.  ;-)

This is a 5x5 size card since I wanted this to be the focus on the card over all. A few simple accents with the mesh ribbon behind the image panel and some sequins in the corners. I do have sparkle added to the petals. Voila!


If you like this, wait until you see the Bloom Brigades creations and our Instant Gardner's creations:


Wednesday, July 13, 2016

Puppy love

Good morning! How about some puppy love today? With summer here, Ranger sure does get a lot more loving from the boys since they are home all day. He acts like he is one of the boys right along side them when they are playing games or running around playing football. It is very cute. He does know how to play football in fact. He loves it and so do we. Anyways.... 


Dusted off this sweet guy from Whipper Snapper called Good News Puppy. He is stamped on white card stock and colored with various Copic markers. I then die cut his panel with Lil Inkers Stitched rectangle die. This plaid paper was perfect for the feel I wanted for this card. Used some hardware to tie off my ribbon, both of which I have had FOREVER! Stamped a paw print and popped it up on dimensionals. Voila! Hope you have a wonderful day! 

Monday, July 11, 2016

Wedding Congrats

Good morning! Was your weekend relaxing and fun? Hopefully it was great and you are ready for a fun filled week, it is summer you know.  ;-)  I was able to get into the stamping room this weekend and happy to say it was great. We have a wedding coming up here soon so my first card was easy using Dream Wedding


Wedding cards to me are always so classy in a black and white theme with a touch of red for elegance. The cherries on this cake were perfect for the red with some added red die cut flowers. The wedding cake has sparkles added to it as all cakes need some sparkle. My sentiment tag at the top with a matching red die flower and some flourished white paper accents. Voila! Have a wonderful day! 


Wednesday, July 6, 2016

Chocolate Lasagna

This long weekend was great and an opportunity for me to try a dessert recipe that I pinned. I pin a lot of desserts yet never seem to make them as much as the main courses I pin. My plan is to attempt more of the desserts!  ;-) This is Chocolate Lasagna


Now the photo doesn't look as awesome as the blogger that posted her's, however I bet you it tasted just as good. hee hee  You can find the recipe at Jaimelyn at I heart naptime HERE. The boys wanted more chocolate chips on top than the recipe initially called for hence the layer you see. I just scrapped half them off and ate the rest. It was DELICIOUS! Great for the BBQ we were at and its a cold dessert so even better with the hot weather. Thought I would share another foodie post. Have a wonderful Wednesday!  

Sunday, July 3, 2016

Christmas Mini's

Good morning! Hopefully you are all enjoying the extra long weekend and relaxing. I know that I have enjoyed it so far with friends and a few BBQ's already and its only Sunday. hee hee  The Dirty Dozen July Christmas is up and it is called Christmas Mini. Use those tiny stamps or accent stamps and create a card. Or make a mini card 3x3 and have fun with it. Hope you can play along! 


My tiny holly sprigs are from Merry Littles that I stamped on a circle die cut and colored with Copic markers. Then die cut another shaped die in kraft for behind the sentiment panel and circle. Layered some designer paper over the shaped frame. Wrapped some crochet ribbon and tied a bow with dark green ribbon. Added the final touches of some jewels and stickles. Voila! Hope you have a wonderful and safe Fourth of July!